Thursday, May 24, 2012

Sugar Roses

Its all about sugar roses for the past 3 days.  I used to dislike roses because its too common.  When people talk about flowers its always roses....that's why.  I know I am weird.  But when customers start to ask for roses I have no choice but to learn to make them.  I always tell people that rose is one of the most simple yet the most difficult flower to make.  If the petals are not put together properly it might end up looking like a cabbage.  The edges too must not be over-frilled.  This is a common mistake amongst us.

Anyway for this coming wedding cake its ivory color roses.  Love this color.  Usually i will dust some petal dust over it but this time I want to keep it simple and 'fresh'.

My working table

Keep my flowers in the box over night
before I arrange them in bouquet


Buds as fillers for this cake

White fantasy filler flowers
Close up


cake topper

Cake topper

Cake topper


Wednesday, May 16, 2012

Single Tiered Wedding Cakes

A bride wanted a simple single tier wedding cake and has eyed on the Lace Gift Cake I made 2 years ago....which was inspired by Ron Ben Israel.  As usual I do not like to repeat what I did earlier coz there's no oomph...so I made some changes.  Besides using lace molds I ordered from US I also made 3 of my own.....so as to make it more interesting to decorate.

Their theme colour is gold.

Lace Wedding Cake
(For Groom's side)

Lace Wedding Cake

Side view

Close up of the sugar lace pieces


Peony Wedding Cake
(For Bride's side)

A single tiered wedding cake for the bride's home ~ sugar peony.


White Cymbidium Wedding Cake


Another single tiered cake with white sugar cymbidium and some blings.


Rose Wedding Cakes


Another Rose Cake


 I love the color combination of this cake.
Unfortunately not all customers are game for it.


Cinderella with Gus & Jaq Cake

Actually I do not like to do Disney characters coz I have to copy them exactly.  It is even tougher when my customer wanted a plastic doll for Cinderella with ready hair (sewn to the head).  I asked permission from customer if I can cut the hair off and replace with sugar paste.  How else do I make it look like Cinderella...with her signature hairdo??

I also had a hard time making Gus and Jaq.  In fact I made 2 sets and chose the better ones.

Cinderella Cake

Cinderella with Gus and Jaq

Jaq - completely sugar paste

Gus - round and cute

Some of the pumpkins

Cinderella with her
sugar paste hair

Thomas Train Cake

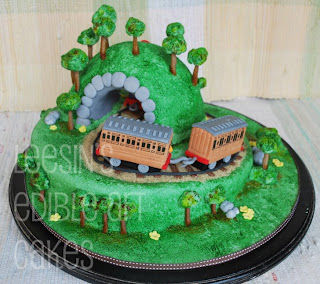
This customer ordered a cake for his niece last month and came back for another...for his nephew this time.  He wanted a Thomas Train Cake.  I had wanted to make a big sculptured train but decided to design something different....a tunnel for Thomas.

I use lots of green for this cake as I wanted Thomas to be running thro a hill in the countryside with lots of trees.  Thomas and his best buddies...Clarabel and Annie!

Thomas Train Cake

Top view - hill with lots of sugar trees

Back view - Clarabel and Annie

Side view

Close up of Thomas - modelled
with sugar paste

Fron view

Notice the tunnel running thro the hill?

Railway track on 'sand'

Beach Ball Cake

Another return customer.  This time the customer wanted something round...can be a ball or globe or anything round.  I had suggested a Toy-train Cake at first but decided to keep to a ball.  Upon checking on the internet it is mostly Football Cake but I do not like a black and white for a 1 year old so suggested a Beach Ball Cake instead...make it colorful with pail and spade....and lots of 'sand' and 'seashells'.

The ball is butter cake then covered with white chocolate ganache before covering with fondant.  It is not the usual cake-ball where its stuck at the bottom to another cake or a board....but can be taken out and play with...coz I covered the cake completely with fondant.  The birthday boy can take the ball out to hold before cutting.

Everything is edible here.....sand, seashells, pail, ball, spade

Complete set for Isaac - Beach Ball Cake


Edible sand

Edible seashells & spade

Butter cake inside

Close up of seashells

More seashells

This is the thank you message for the mummy
Dear Lee Sin. Thank you very much for the awesome beach theme cake! They're so tasty and we love it to the last bite :) Isaac enjoyed the lovely butter cake!! Thank you again....

I should be the one saying thank you Erna!  Terima Kasih to you & Shariff for trusting me.


Roulette Cake

This cake was commissioned by a returned customer. It was meant for her grandma's 88th birthday but later decided to change it to a Father's Day cake.  She wanted something different so asked if I can make it playable.  So far I have only seen Buddy from Cake Boss made one that is movable and the rest were just cakes that looked like roulette wheel.  Lots of planning and drafting before I see the final cake taking shape. Also special thanks to Weenee to suggesting I use the ganache method for a stronger cake.

The stress and hardwork pay off pretty well I guess.  My customer came with friends and brother to collect this cake.  They were so excited...their appreciation came with screams and bows. 


Top front view

Hand drawn card

Gold 'plated' plaque in front
Sugar dices and chips stacked up high

Hand drawn 'King of Hearts'

The Koid casino chips

The turnable wheel in the center

Because this post was used to spam for the casinos I have taken out the comment section.  I am sorry for the inconveniences.  Those who needs to contact me please What's App me with the contact no. as on the right top.

Friday, May 11, 2012

Beer Bottle Cake

It has been months since my last post.  Procrastination I guess.

Anyway I had always wanted to make sugar bottles but due to the lack of materials and knowledge to make my own molds I decided to shelf the idea.  Then last week I accidentally saw a friend holding some molds he made and begged him to make a bottle mold for me.  Weenee from Sugar supplied me with the isomalt which I cannot find anywhere else in Penang....a leftover from a Sugar Art class she organised recently.  SO I guess its fated that I get to make a cake with sugar bottles....in time for my hubby's birthday.

First I looked up the internet on how to make the bottles.  Found some very infomative videos and quickly start to work.

I cooked the isomalt to the require temperature then crushed some foil to pour the colorless isomalt into ....as ice.  Left it to cool down and dry in front of the fan.  Then tint the balance of the isomalt to that of Tiger beer bottle color...brown & orange.  As I was pouring it into the mold I spilled some onto my fingers!!  Remember.... I worked alone so it was a case of holding, balancing and pouring.  Of coz I dropped everything and ran for the ice-cubes but that few seconds was to late.  Should have used gloves but its difficult to work with one.  It was so painful my heart was pumping like hell but I had to continue......blisters or not.

As usual I am a very impatient person and did not really turn my molds continuously as advised....and this was the result of my first bottle.  Solid top!  Also the mistake of drying the bottle upside down.  Nevertheless I waited till it was cooled down, remove the mold and sprayed lacquer over it.

Solid top

My second one...I turned the mold upright too early and the soft sugar dropped down!!!  Urggg!!!

Notice the excess sugar 'dripping' down?

My third one was beautiful...even thickness all around ...but when I was pulling down the mold (holding the bottle upside down) I press the mold too hard against my table for leverage the bottle inside crack!!!  I was just 1 cm away to completely removing the mold and a perfect bottle!!!!   I wanted to kick myself.  Why oh why????  The good thing about isomalt is that it can be re-melted and re-use.

The beautiful but cracked bottle being melted for re-use

My patience was running thin by then but manage to make 3 more bottles not without more screams of pain.  Yes by then I had more burnts and blisters starts appearing. Anyway I sprayed laquer over my cooled bottles and kept them in a box with moisture absorber.


With 4 bottles I was more than happy so went about making the labels.

The next morning horror of horrors!!!!  The surface of the bottles wrinkled up!!!!  I had no time to think or analyse but to make new bottles....as its already D-day!!

The bottles starts to wrinkle once
exposed to humidity even after
lacquering

With time running out I made 4 more bottles....to be exact 3 half-bottles and one full.  I had to put them in front of a fan with air-cond on as well.  It did not dry completely but I just stick on the labels and put kitchen foil on top the bottle as a cap. Looks good enough to pass off as real metal cap.

Fastward.....I covered my Carrot Walnut cake with fondant which was already filled with homemade cheese frosting and ganached the day earlier.  I then placed the 3 half-bottles on top and removed the ice from the foil and placed them on top of the cake.  Did some finishing touches here and there and ta-da.....my completed Beer Bottle Cake!!!!


The completed cake


The close up of the bottle with
printed labels
The back with printed labels

Close up of the isomalt ice

Close up of the label on the 'cap'

The cut cake